
Crimsyn Cosplay WWWIP Week 4


Construction of Fiddlesticks’s Headpiece
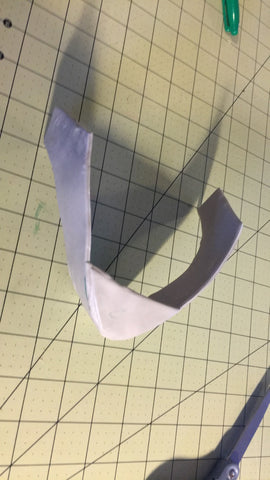
To start this construction, I always start with creating a pattern. Since I want a WORKING hinged jaw, I started out with creating a basic shape that would fit my jaw. I did this the traditional way with painter’s tape and a pen, transferred that onto paper, then into Thibra!
|
|
 |
|


To keep this piece on my head, I had to have another piece that wrapped around the top of my head as well as a small notch for my chin to catch. The hinge would be where the two pieces intersected (around the middle of the ear, slightly below the top of the cheekbone).
 |

|
Step Two: Creating the Hinge
This part was tricky and required a bit of anatomical research. What I wanted to do was create something that would open and shut when I open and shut my own jaw. My first thought was using a screw or something that literally acted like a hinge, but before I did that I wanted to understand how the actual human jaw worked. I found out that the jaw opens and closes due to muscle contraction. So, the closest thing I could think of that contracts was elastic! Therefore, I created a strong way to attach elastic to both ends of the thermoplastics.
 |
 |

|
The first picture displays the shape I sculpted the thermoplastic into. I figured this was strongest compared to just having the elastic glued or attached to the end of the piece. The last picture is an awkward selfie of me testing the mobility–and I was SO surprised that it worked perfectly!
Step Three: Creating the Mask Structure
Since I was able to create the jaw the way I imagined, I needed to build the basic under-structure of the entire mask around the build of the jaw. I was cautious about any material near the hinge–I didn’t want to impair its function.
 |
 |
 |
To create this under-structure, I cut strips of craft foam that measured 1” to 1.5” and sandwiched them between pieces of Thibra. Then, I placed them as lateral semi-circles across the pieces of the previously built jaw. I determined the size and position of the Thibra strips by referencing a profile picture of my character. This helped me understand the contours of the character's face. Additionally, I focused on the huge under-bite Fiddlesticks has; I wanted to make sure it was proportionally correct!
Lastly, I located the proper placement of the straw jutting from the back of the head and placed some Thibra strips to contour that area. This will help later by giving support and an area for attachment when placing the straw in.
Step Four: The Teeth
Before covering the entire under-structure with fabric, I needed to add the teeth. I knew the teeth would add bulk to the upper and lower jaw, so if I added them in later, they would sit on the outside of the face and just look odd. Therefore, I needed to add teeth first, and wrap the entire mask with muslin and burlap after!
 |
 |
 |
To create the teeth, I simply carved elongated teardrop shapes from pink insulation foam. Then, I shaved them to make them more round and simply covered them with muslin and burlap using hot glue.
I swear I made 50 of these! My fingers are officially burnt!
Now, I just needed to add them to the under-structure and add some additional bits of padding to help the facial proportion.
 |

|
Step Five: Covering the Under-structure
Now to cover the WHOLE thing with fabric! The first layer I used was muslin, then the second layer with burlap. I used these two layers throughout the entire build of the gloves as well. I think it makes the burlap less transparent and helps smooth out any lumps. To do this properly and smoothly I need to use tape again and create a pattern that fits over the mask.
 |
 |
 |
This pattern piece mainly covered the upper-front area of the mask, the rest of it was done with rectangles and a bit of strategic gathering. Honestly, this is where I got really excited because it's getting so creepy!
Step Six: The Eyes
The last step for this week is to properly place the eyes. Looking at the reference photo, I noticed that Fiddlesticks has a strong furrowed brow, so I quickly sculpted a shape out of foam and glued them on. The eye shape is extremely important to get right because it gives the mask a specific emotion and is important to the whimsicality of the character. I did this by cutting out shapes with paper and pinning them to different places along the mask. I originally had an issue with the eyes being off-centered and too far apart, but eventually I found the correct placement! Finally, I simply cut through all the layers and wrapped the fabric to the underneath using some glue to help.
 |
 |
The eyes really started to pull everything together, and I can’t wait to add lights and stitching details later on!
See you next week! :)
Crimsyn