

Creating Different Shapes for Wigs
Published: 23/6/2017
 |
 |
Choose the wigs you want to combine. I used 1 lace front (Lindsay in Dark Brown), and 1 Ororo in Pale Blonde.
 |
 |
Put them on a plastic head to decide the shape of the wig you want to create.

Draw the shape you desire. Be sure that the size is the same on both the wigs.

Start to cut.
 |

|
 |
Add some wefts to the blonde part.
 |
 |
 |
Then you can sew all the pieces together starting near the lacefront, then on the nape, and then fill all the wig.
 |
 |
 |
Take a piece of polystyrene, draw and cut the shape with a cutter and use a piece of sandpaper to smooth the line.
 |
 |
Paint the piece the same color (or a little darker) as the hair you'll be adding on, or glue some fabric on it. I personally prefer to use fabric.
 |
 |
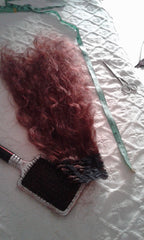
Take the piece of the wig you cut away before, and separate into 4 piece. Then cut the hair in half. You will need about 7 half pieces for each side.
 |
 |
With the hair you cut, you can create more wefts. Position the hair on a piece of fabric, glue them, then fold the fabric and press to seal the hair.
 |

|
 |
After you have about 14 pieces, position them on the piece of polystyrene. If you are satisfied, you can start to glue the pieces in that position
Comb the hair and use a LOT of hairspray. Let it dry: 15-25 minutes in summer, or about 2 hours or more in winter. Do it several times, and when it's dried do the same on the other side.
 |

|
 |
 |
 |
Then you need to create the piece that go inside the wig. Use a strip of fabric glue on some eva foam, and then add a strip of worbla or aluminum (the one I use) or something else that's rigid but flexible. Decide where to position the mohawk, and create 2 holes on the mohawk and on the fabric-foam-worlbla/aluminum sheet. It's necessary to put the screws in the holes first, and when the screws are just a little visible they had to be pushed and tightened into the mohawk. If the screws are completely in, it's impossible to put the mohawk on it; they need to be pushed gradually
 |

|
You can use polystyrene to create other shapes. For example: my Giorno Giovanna's Donuts, and the horns of my Emperor Dragon cosplay.
 |
 |
 |
 |
 |
 |
 |
 |

|
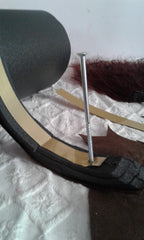
If you want some longer and shaped pieces like horns, You need to cut and seal the tubular crin and insert some wire of the same length.

Pressing on the tubular you'll see that it starts to shape.
 |
 |
You can seal it with glue or by sewing it. Cut a piece of fabric and apply it on the bottom so you can sew the piece onto the wig.

You can style or glue some hair on it, or just use it like it is! I wanted it a little visible for example, and I used the tubular to also add some detail on the crest.
I used the tubulars as well for my Dye Challenge wig, pictured above.
There are many characters with strange crest, horns, or tentacles so hope the tutorial could help you! (:


